Introduction
Last month, Sucker Punch released patches for both Infamous Second Son and First Light that added HDR and 4K display support. This two-post series will focus on some of the technical aspects of adding HDR support to these games; I’ll save a discussion of 4K support for a (possible) separate post. (For a more consumer-oriented description of the features we added with these patches, please see Jason Connell’s post on the PlayStation Blog).
When we started working with HDR displays back in early 2016, we weren’t sure what to expect. Some of us had seen impressive HDR demos on show floors, but experience has taught us that reality doesn’t always live up to the hype. Fortunately, HDR did not dissapoint.
It turned out that both PS4 Infamous games were ideally suited for HDR displays. Both games were authored and rendered with physically-based HDR lighting pipelines; only at the very end of the frame did we tonemap and color grade to SDR. Our adherence to physically-based lighting principles meant that we didn’t use any lighting “hacks” that broke down when we switched to HDR display output; as a result, we didn’t have to re-author any content for HDR; everything just worked, and looked better. Our heroes' superpowers looked especially good when displayed on a good HDR TV; color and details were visible that previously washed out to white.
In this post I’ll discuss our HDR tonemapping and color grading solutions, and the HDR-friendly render target format we used to help improve performance.
Tonemapping
At Sucker Punch, we’ve switched to (approximate) ACES filmic tonemapping (inspired by Krzysztof Narkowicz’s post), and we’ve been very happy with the results. Since ACES also has an HDR output device transform (ODT), it made sense to try it. (Krzysztof also did the same thing in parallel, which he’s written about here.)
We inititally ported the entire ACES RRT+ODT pipeline to PSSL (the PS4’s shader language), to validate our approximations. The ACES transforms are written in a language not too dissimilar from shader code, so this conversion was straightforward.
We fit curves to the grayscale output of the ACES reference rendering transform (RRT) + output device transform (ODT) for both SDR and HDR displays. Like Krzysztof, we scaled the input to the function to be more consistent with our old tonemapper. Since we feed the output of our tonemapper to a 3D color LUT (in sRGB space), we converted the output of the ACES transform to (unclamped) sRGB and included that in the curve fit.
// Convert a linear RGB color to an unclamped sRGB-encoded color after applying approximate
//  ACES HDR tonemapping (with input scaled by 2.05). Input is assumed to be non-negative.
//  Output is scaled so that 1.0 corresponds 100 nits; the maximum output is ~2.7 (the sRGB
//  encoding of 10.0 = 1000 nits).

float3 RgbAcesHdrSrgb(float3 x)
{
    x = (x * (x * (x * (x * 2708.7142 + 6801.1525) + 1079.5474) + 1.1614649) - 0.00004139375) /
        (x * (x * (x * (x * 983.38937 + 4132.0662) + 2881.6522) + 128.35911) + 1.0);
    return max(x, 0.0);
}

// Convert a linear RGB color to an sRGB-encoded color after applying approximate ACES SDR
//  tonemapping (with input scaled by 2.05). Input is assumed to be non-negative.

float3 RgbAcesSdrSrgb(float3 x)
{
    return saturate(
            (x * (x * (x * (x * 8.4680 + 1.0) - 0.002957) + 0.0001004) - 0.0000001274) /
            (x * (x * (x * (x * 8.3604 + 1.8227) + 0.2189) - 0.002117) + 0.00003673));
}
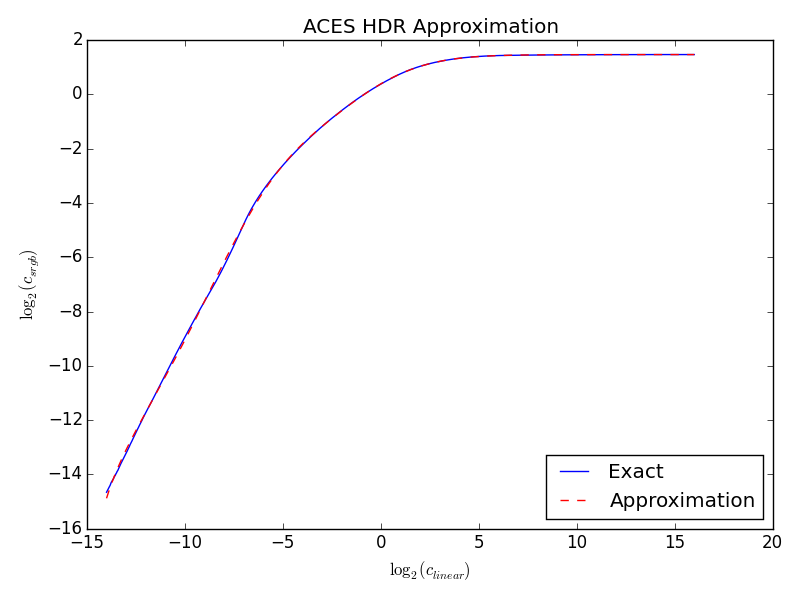
Log-Log Plot of ACES HDR Approximation
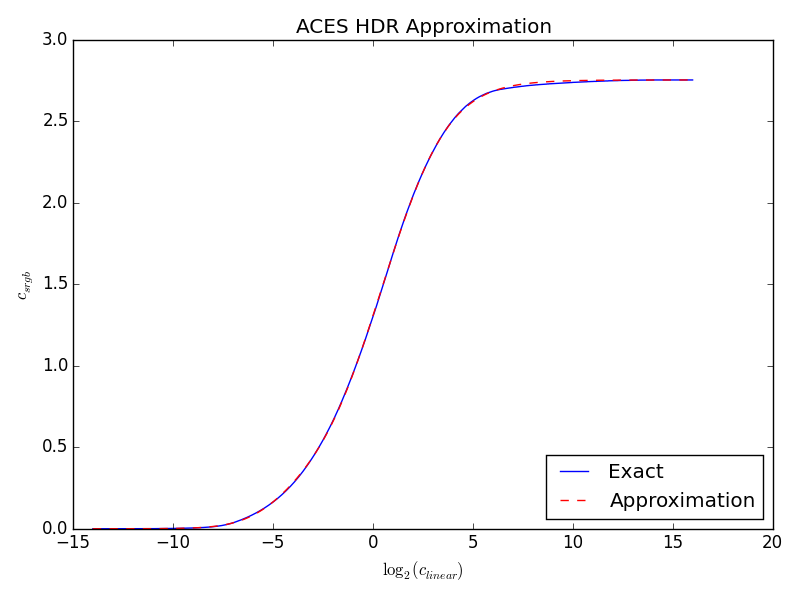
Log-Linear (sRGB) Plot of ACES HDR Approximation
These approximations are an excellent match for grayscale values; the main difference is in red tones, which the ACES RRT explicitly modifies. The ACES code also desaturates bright colors more quickly than we do. It should be possible to achieve a better match by combining this curve with 3D LUT color grading, although this isn’t something we’ve tried.
I’ve included some A/B comparisons between full ACES and the per-channel approximation below. (Please note that these screenshots were taken in SDR mode with color grading disabled.)
Since we were so happy with how the ACES HDR tonemapping curve looked, we decided to switch to ACES for SDR mode too. This made the two modes more consistent in their overall look, and we felt that it gave the colors in SDR mode a nice added kick.
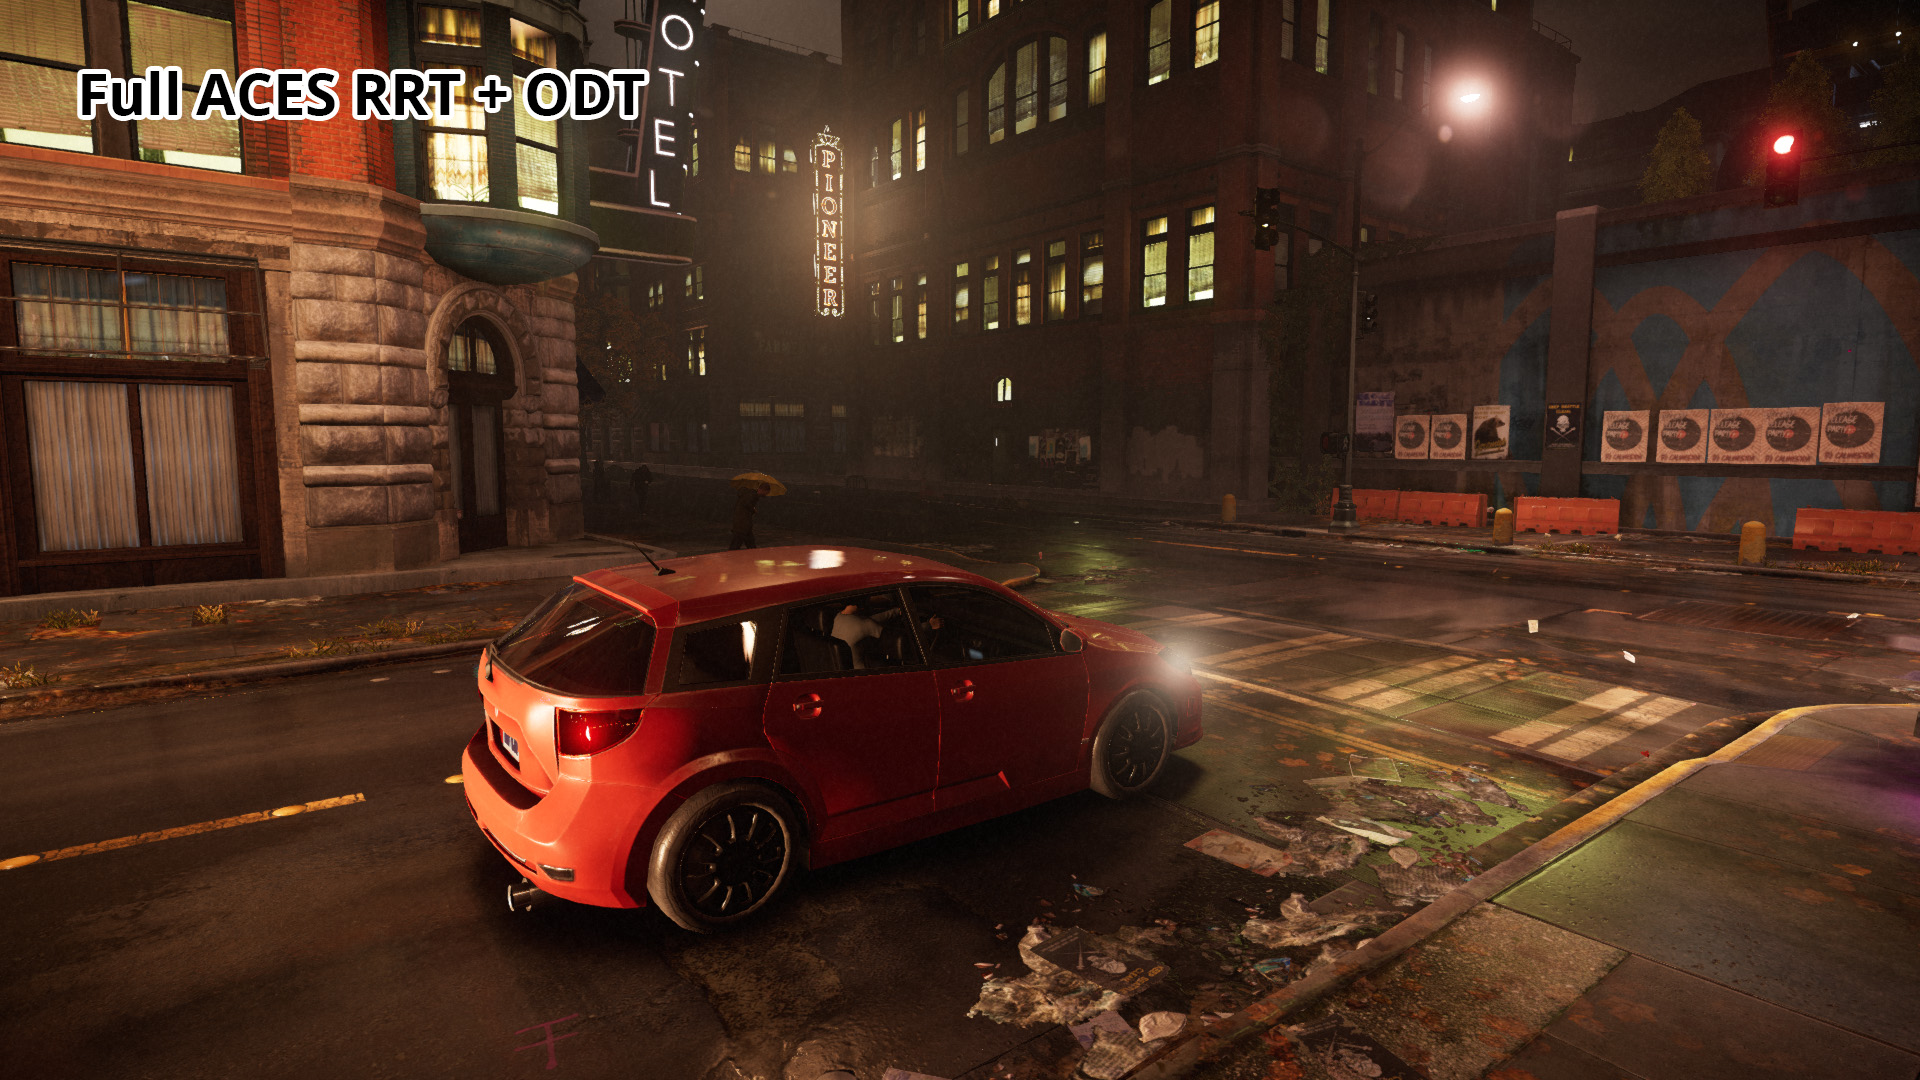
An example of a scene where the difference between the full ACES implementation and our approximation is relatively significant, because of the predominance of red tones.
(Click the image to flip.)
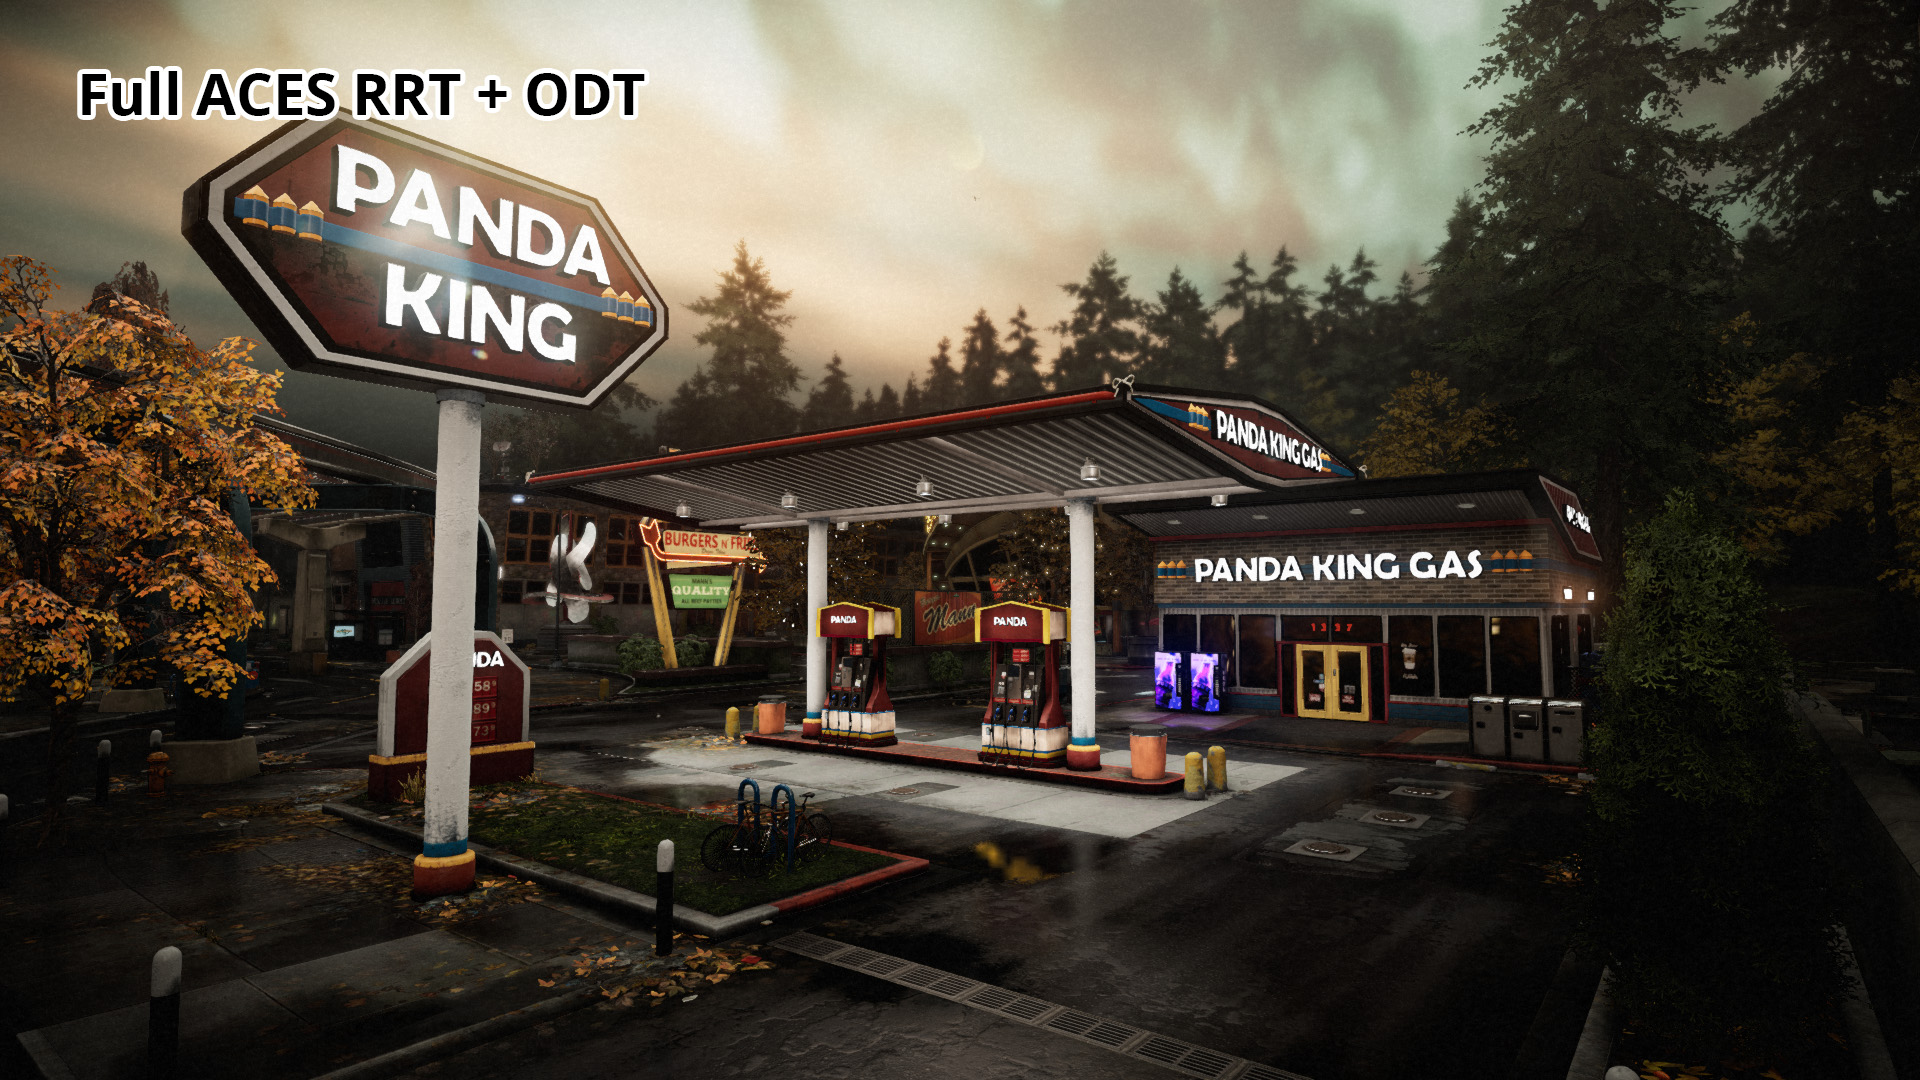
The difference is much more subtle in this scene.
(Click the image to flip.)
Color Grading
As mentioned above, we used a 3D color LUT for color grading in both games. These were authored for SDR TVs, so they assume an input range of [0, 1]. Since time and resources were limited, we didn’t want to have to re-author these LUTs to accomodate HDR output, nor did we want to switch to a different color grading technique for HDR mode.
We opted for a simple solution: we remapped the HDR tonemapped output to approximately match the SDR tonemapped output. After color grading, we expand the range back to HDR using the inverse scale. The end result is close enough to the SDR output, qualitatively, that we didn’t feel the need to make any other additional changes.
// Smoothly clamp x to 1.0

float ColorGradeSmoothClamp(float x)
{
    const float u = 0.525;

    float q = (2.0 - u - 1.0 / u + x * (2.0 + 2.0 / u - x / u)) / 4.0;

    return (abs(1.0 - x) < u) ? q : saturate(x);
}

// Approximate SDR color grading with an HDR image

float3 ColorGradeHdr(float3 rgbHdr)
{
    // Find the maximum component

    float gMax = max3(rgbHdr.r, rgbHdr.g, rgbHdr.b);
    gMax = max(gMax, 1e-6);

    // Clamp HDR to 0-1 range, and calculate scale for re-expansion

    float gClamped = ColorGradeSmoothClamp(gMax);
    float rScale = gClamped / gMax;

    // Perform standard SDR color grading

    float3 rgbGraded = ColorGrade(rgbHdr * rScale);

    // Re-expand to HDR

    return rgbGrade / rScale;
}
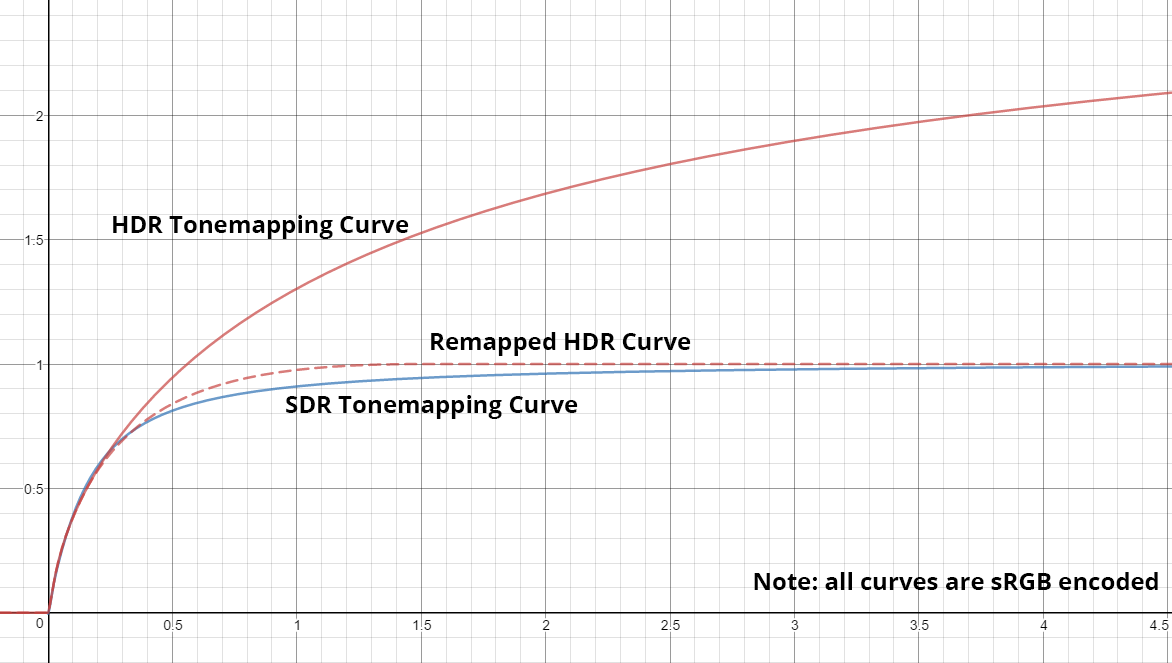
The sRGB-encoded ACES tonemapping curves along with the remapped HDR curve. (Desmos version)
Render Target Formats
With HDR displays, RGBA8 buffers simply do not have enough precision to represent the desired output range without introducing additional banding artifacts. The PS4 requires the back buffer to be PQ encoded (part of the HDR10 standard) in an RGB10A2 buffer, but that doesn’t mean that we need to use this encoding for all of our post-tonemap rendering. Also, the color space of the back buffer must be Rec. 2020 (instead of Rec. 709 for SDR), but since none of the assets were authored for this color space, we can delay the conversion as long as we wish.
In both games, the 2D UI is rendered with alpha blending in sRGB (“gamma”) space. Rendering to a PQ buffer would require us to do “software” blending, which would be expensive since we would need to do the following:
- Convert from PQ to linear
- Convert from Rec. 2020 to Rec. 709
- Convert from linear to sRGB
- Blend
- Perform the inverse of steps 3 to 1.
A better option is to render UI to a separate buffer (in sRGB 709 space), and composite as a final step. We chose a third way which avoids the use of a separate buffer. Instead of tonemapping to PQ 2020, we encode to a format we call sRGB10, which is valid over the domain of 0-10 linear (about 0-2.7 sRGB) — recall that 1.0 corresponds to the SDR peak luminance of 100 nits, while 10.0 (linear) corresponds to 1000 nits, the peak output luminance of our HDR tonemapping function.
The sRGB10 encoding function is given by:
where $f_{srgb}$ is the sRGB encoding function. We can then render UI directly into this buffer with alpha blending,
and the output will be identical to SDR mode, as long as we scale the UI shader output by $1 / f_\mathrm{srgb}\left(10\right)$.
Because of the sRGB10 gamma encoding, very bright objects in our games do not overwhelm the UI elements blended on top of them.
This format retains more than 8 bits of precision for the SDR portion of the curve ($0 \le x_\mathrm{linear} \le 1$). Unfortunately, it’s not possible to use hardware sRGB encoding and decoding, since the sRGB and sRGB10 curves don’t match. (Even if they did, on the PS4’s GCN hardware, the sRGB conversion only preserves 8 bits of precision, making it inappropriate for use with HDR signals.)
Switching to this format (from RGBA16F) was the single most effective HDR performance optimization, since it significantly reduced the bandwidth requirements of our antialiasing and 4K upscaling passes.
(I wasn’t aware of it until writing this post, but NVIDIA describes a similar approach here, though that approach uses a floating-point buffer instead of a fixed-point buffer, and is scaled slightly differently.)
Stay Tuned!
In Part 2 of this series I’ll discuss a couple more performance optimizations we made, how we matched the look of the SDR and HDR modes (in the darker parts of the image), as well as some issues we ran into when combining HDR and 4K on the PS4 Pro.
References and Further Reading
- Krzysztof Narkowicz, ACES Filmic Tone Mapping Curve.
- Krzysztof Narkowicz, HDR Display – First Steps.
- Evan Hart (NVIDIA), Displaying HDR Nuts and Bolts.
- Jeroen Soethoudt (Nixxes), Jurjen Katsman (Nixxes), and Holger Gruen (NVIDIA), Implementing HDR in ‘Rise of the Tomb Raider’.
- Scott Miller (Dolby Laboratories), A Perceptual EOTF for Extended Dynamic Range Imagery.